
Tutorials
Making a Cabochon
Making a Bead:
About Blanks
Sometimes as much as 60% of the cutting stock is waste. Cutting proper blanks for your project becomes the foundation of your work. It is critical. Whether a cab, carving, or bead, you must properly orient and prepare the material for the job at hand. For a bead project, you will need a neatly trimmed ˝” cube or a ˝” x ˝” x ľ” rectangle. For this project we are using a softer material, about a 5.5 on the Mohs scale, a nice banded marble. The pictures will help you to see the details of production. We begin by cutting our bead blanks on an 8” diamond trim saw. We work to maximize our yield, but never at the expense of the quality of the finished bead. Let’s get started.

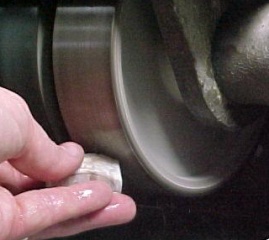
Shaping
Because you oriented your stone, you know what direction the hole will go and the way the finished bead will hang. Begin on your grinding wheels by knocking down the edges on all long sides of the bead blank, leaving only the sides that will be drilled, (the ends) un-softened. You are turning a cube into an octagon. When you have an even octagon, you may wish to stop and drill the bead. Once the bead is drilled, a mandrel may be used to hold the bead against the turning wheels, thereby saving your fingers. If you have several diamond wheels on your machine be sure to start with the coarsest wheel and move to the finest wheel with out missing any wheels. Take your time. We are making a bi-cone shaped bead. (Sort of a football shape)
Drilling
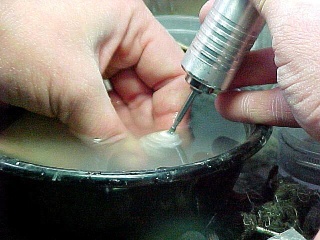
Using a suitable shallow dish of water to hold your blank under. Find the center of your bead blank, and using a diamond drill bit set into the hand piece of your flex-shaft machine, lay the diamond drill tip slightly angled onto the stone to produce a small dimple where the drill bit will fit without skittering off the stone. Now slowly raise the drill bit up so that it is perpendicular to the end of the stone. Drill into the stone about half way by bumping the drill bit up and down slightly allowing the debris from the center of the stone to wash out. I know that many folks prefer a drill press, but I still prefer to do this by hand so I can feel what is happening to the stone. Flip the stone and do the same thing on the opposite end. You are going to “double drill” your bead to avoid a blow-out. Meaning you are going to drill half way through your bead from each side and meet in the center of the stone to complete a superior hole. As for drill bits, we use a 1.8 Triple-ripple diamond drill bit for most of our beads.
Sanding
On a mandrel or off, you will need to spend a fair amount of time at your machine sanding the bead on 4 to 7 successively finer diamond grit wheels to achieve a good polish and super result. Work all the surfaces of the bead around and around and don’t spend any time holding the bead still on the wheels or you will flatten that spot and have to re-shape your bead. The key to success is; Keep moving! When your bead has been through all the wheels and there are no scratches, you are ready to polish the piece.

Polishing
There are several polishing compounds on the market, and depending what your material is, you may need to stock in several. For a soft material like our banded marble, we are going to use a polish called ZAM. We are going to load a muslin buffing pad mounted on a conical mandrel on our bench lathe with the ZAM by turning on the lathe and holding the ZAM stick lightly against the spinning muslin buff. Now we are going to polish the bead. Once the stone has been polished by holding it against the spinning buff, we are done.


Copyright 2011 Ken Dinneen
All rights reserved